How To Set Up Your Camera
The Basics of Camera Terms and Setup Skills
Camera Setup Basics
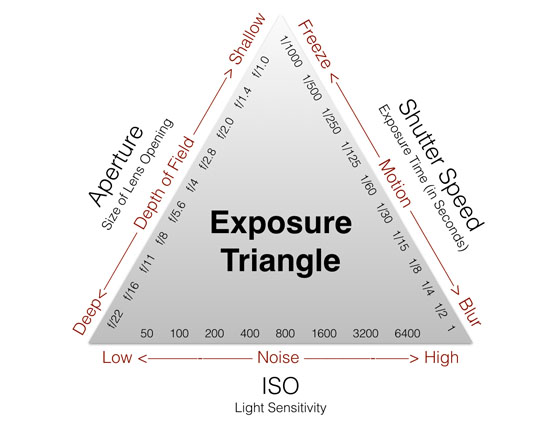
In order to understand your camera and take advantage of its manual settings so you can create the “look and feel” you want, you need to understand these 3 fundamental concepts of exposure.
These 3 elements are often referred to as the “Exposure Triangle.”
Knowing how to adjust these 3 settings manually will allow you to get the most out of your camera and give you much more creative flexibility.
NOTE: You can also use your cameras Auto settings, but in doing this, the camera has to guess based on the light coming into the shot what settings to apply.
It’s much better to just learn what these 3 things mean so that you can adjust your own settings and get the perfect look.
I recommend always starting with your ISO settings (this is like setting up the foundation of your camera), then tweaking your aperture as needed.
TIP: I also recommend using the auto-focus feature on your camera, unless you’ll be moving around a lot, in which case you should set your focus manually to capture the appropriate depth of field for your range of subject motion.
ISO
This is the level of sensitivity of your camera to available light. A lower ISO represents lower sensitivity to light, while higher numbers mean more sensitivity.
However, as the ISO increases, so does the grain/noise in your images.
Examples of ISO: 100, 200, 400, 800, 1600
I typically always shoot at 800 ISO — this is a good “base” for ISO when you’re indoors during the daytime.
Shutter Speed
This is the length of time a camera shutter is open to expose light into the camera sensor. Shutter speeds are measured in fractions of a second.
Examples of shutter speeds: 1/15 (1/15th of a second), 1/30, 1/60, 1/125
Slow shutter speeds allow more light into the camera sensor and are used for low-light and night photography, while fast shutter speeds help to freeze motion and create crisp, sharp images.
Shutter speed isn’t AS important when filming because during video capture, the lens isn’t closing. However, if you’re a food blogger or are capturing images along with your video content (for example, in order to create a YT thumbnail), this aspect becomes very important.
Aperture
This controls a hole within a lens through which light travels into the camera body. The larger the hole, the more light passes to the camera sensor.
Aperture also controls the depth of field, which is the portion of a scene that appears to be sharp. If the aperture is very small, the depth of field is large, while if the aperture is large, the depth of field is small.
Aperture is typically expressed in “f” numbers (also known as “focal ratio” or “f-stop”).
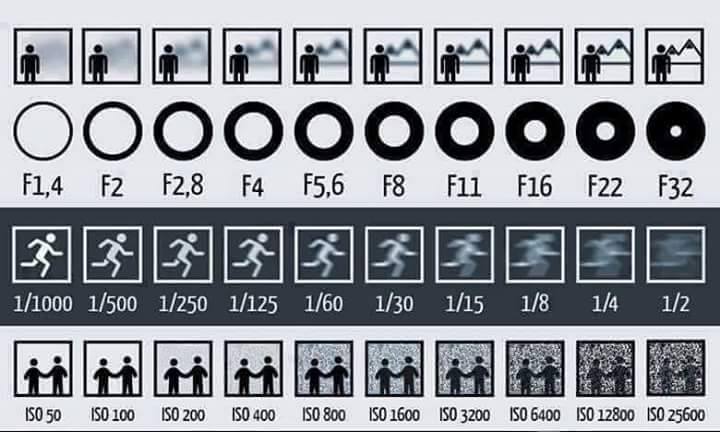
Examples of f-numbers are: f/1.4, f/2.0, f/2.8, f/4.0, f/5.6, f/8.0
The lower the f-stop (i.e. f/1.4), the WIDER the hole in the camera, and the brighter the image will be (more light is coming in through a more open lens).
The higher the f-stop (i.e. f/8.0), the SMALLER the hole in the camera, and the darker the image will be (less light is coming in through a more closed lens).
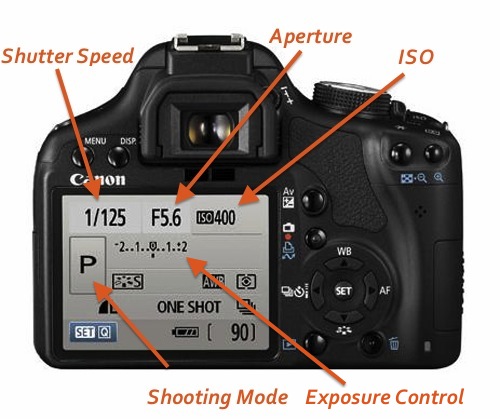
When you’re setting these 3 settings manually, make sure you ALWAYS check the exposure control bar.
The aim is to line up the control ticker with the “0” setting in the middle as closely as possible.
Some YouTubers and bloggers will go with a slightly overexposed look to give the shot a light and bright feel. Setting the ticker to be one or two notches above the “0” setting will give you that slightly overexposed look.
Below is a great visual representation of what will happen to your shots when adjusting these 3 basic camera settings.