How To Set Up Your Microphone
What To Look For…
However, in general, you ALWAYS want to keep your input signal peak between -12db and -6db.
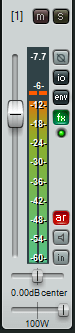
Every mic has an audio signal meter that looks like the image above. This is where you can measure your audio input levels and adjust them as needed.
You can also adjust your audio in post-production, but it’s best to first adjust your levels during recording so you can save time in editing and make sure your files are capturing the best audio possible.
TIME SAVING TIP:
When you’re ready to hit record, I also recommend ALWAYS stating first that “This is [your name] filming [name of video]” before jumping into the actual content.
Why?
Because when you are ready to batch upload your audio files, you will want this quick summary of what the audio file includes AT THE BEGINNING of the file (for when you’re previewing them during upload) so that you can be fast during the importing and renaming of your audio files.